
Key Points for Adjusting the Fit of Handicraft Qipao During the Try-On Process
Handmade Qipao Fitting and Size Adjustments: What Actually Matters When You Try One On
There is a moment every qipao wearer knows well. You step into the garment, the silk slides against your skin, and something is just slightly off. Maybe the waist gapes. Maybe the hip pulls. Maybe the collar sits a half-centimeter too high and chokes your breathing. This is normal — handmade qipao are living things, and they almost never fit perfectly on the first try. The real skill is knowing what to adjust and how much to adjust it.
The First Try-On: What to Check Before You Touch a Single Seam
Do not grab scissors the second something feels wrong. Stand in front of a full-length mirror. Turn slowly. Watch how the fabric moves. Most fitting problems reveal themselves in motion, not while standing still like a mannequin.
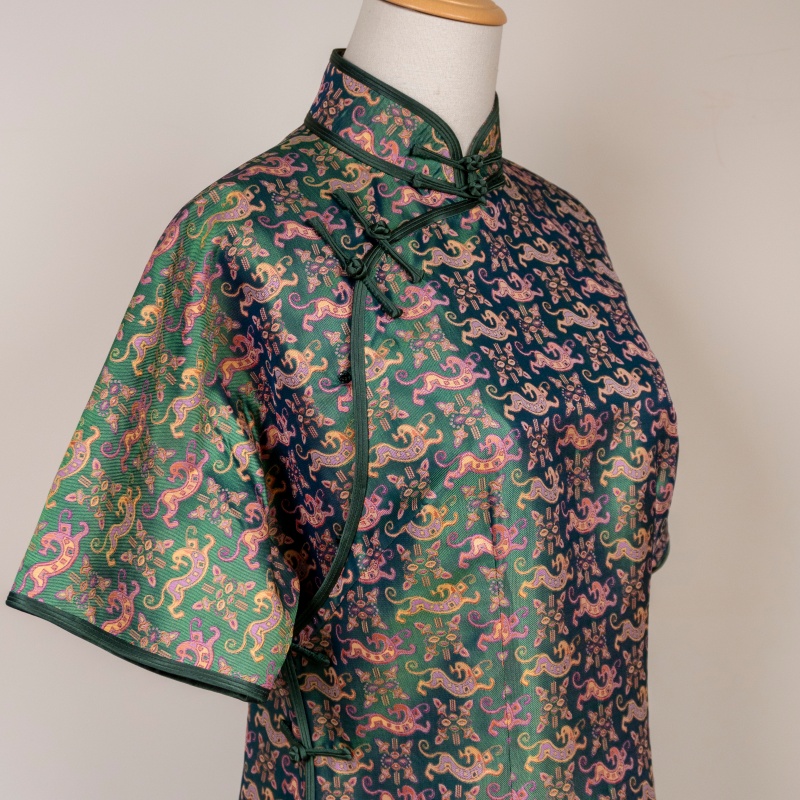
Waist and Torso Fit
The waist is where most handmade qipao either shine or fall apart. When you breathe in, there should be roughly one finger’s width of space between the fabric and your body at the narrowest point. If you can fit two fingers, the waist is too loose. If you cannot fit one, it is too tight — and no amount of letting out a seam will fix a pattern that was cut too small in the first place.
Pull the placket gently closed with one hand. If the fabric puckers or pulls diagonally across your chest, the bust dart placement is off. This is a pattern issue, not a seam allowance issue. Mark where the puckering starts with a pin so your tailor knows exactly where to work.
Hip and Lower Body Flow
A qipao should hug the hips without binding. Walk three steps forward and three steps back. If the side seams ride up toward your waist when you walk, the hip measurement was cut too narrow. If the fabric sags and bags below the hip, it was cut too wide. Either way, the fix lives in the side seam — but only up to a point. Most handmade qipao allow about 1 to 1.5 cm of ease in the hip area, and going beyond that starts to destroy the silhouette.
Collar Height and Neckline Comfort
This one trips people up constantly. The collar should sit at the base of your neck, not choking it. You should be able to swallow comfortably and tilt your head back without the collar edge digging in. If it feels tight, do not assume you need to let the collar out. Often the problem is that the collar stand — the stiff inner layer — is too tall. Shortening the stand by even 3 mm can transform the entire feel of the garment.
Common Adjustments and How Much You Can Actually Change
Every adjustment has a limit. Push past it and you are not altering the qipao anymore — you are remaking it.
Taking In the Waist
This is the most requested alteration and also the most delicate. You can take in up to 2 cm total from the side seams (1 cm per side) without distorting the drape. Beyond that, the princess seams start to shift, and the front placket will no longer lie flat. If you need more than 2 cm taken in, the honest answer is that the pattern needs to be redrawn, not just the seams adjusted.
When taking in the waist, always work from the bottom hem upward, not from the waist downward. Working upward preserves the shape of the hip curve. Working downward flattens it.
Letting Out the Hips
Letting out is easier than taking in, but it has its own trap. You can add up to 1.5 cm per side along the hip seam. Any more and the fabric starts to bag in strange places because the grain of the silk was cut to follow a specific curve. When you add width, you break that curve.
Use a fabric that matches exactly in weight and sheen. A mismatch here is immediately visible — the altered section will look stiffer or shinier than the rest of the garment.
Shortening or Lengthening the Hem
The hem of a qipao is not just a hem. It carries the weight of the entire silhouette. You can shorten by up to 3 cm without major consequences. Lengthening is riskier — adding fabric at the bottom changes how the qipao hangs, and if the original hem had a specific fold or weight (some makers add a tiny chain or bead inside the hem for drape), you lose that balance.
If you must lengthen, add the fabric at the side seam, never at the center front or center back. Side seam additions are invisible when the qipao is worn.
The Collar and Placket: Where Small Changes Make Huge Differences
The collar and placket are the most technically demanding parts of any qipao, and they are where amateur adjustments cause the most damage.
Fixing a Collar That Gapes at the Throat
If the front of the collar opens away from your neck, the issue is usually the collar stand length, not the collar itself. The stand is the hidden inner piece that gives the collar its shape. If it is too short, the collar folds outward. If it is too long, it presses into your throat. Adjusting the stand by just 2 to 3 mm fixes most gape problems. This is micro-adjustment territory — a skilled hand with a sharp needle, not heavy scissors.
Realigning the Placket When It Twists
A twisted placket is one of the most frustrating fitting issues. The front opening spirals instead of lying flat. This almost always means the button placement is off by even a millimeter. Each pankou pulls the fabric slightly toward itself. If one button sits 2 mm higher than it should, the entire placket rotates.
The fix: unpick the pankou one at a time from the bottom up, reposition each button by tiny increments, and re-sew. It is tedious. It is also the only real fix. Do not try to correct a twisted placket by pulling the fabric — you will just create new wrinkles elsewhere.
When the Shoulder Seam Sits Wrong
Shoulder seams on a qipao should land exactly at the edge of your shoulder bone, not hanging off the arm and not cutting into the shoulder. If the seam sits too far inward, the armhole will bind when you raise your hand. If it sits too far outward, the sleeve cap (even on a sleeveless qipao, there is a cap) will gape.
Shifting a shoulder seam by more than 5 mm requires re-cutting the armhole curve. This is not a beginner-level adjustment. If your qipao needs this, find someone who has done it before.
What to Tell Your Tailor So They Actually Understand
Most fitting disasters happen because of bad communication. Saying “it does not fit” tells a tailor nothing. Here is what actually helps.
Pin the exact spot where the problem occurs. Say “I need 1 cm taken in here, at the waist, on the left side seam only.” Specify whether you want the change to happen at the seam line or through a dart. Ask whether the adjustment will affect the placket alignment. These questions separate a good fitting session from a wasted one.
Bring the qipao to the fitting in the same undergarments you plan to wear with it. A strapless bra, sheer shapewear, or even nothing changes how the fabric sits. What fits over a bare torso will not fit over a padded bra, and vice versa.
One final thing — handmade qipao are cut on the bias or near the bias to achieve that signature body-hugging drape. This means the fabric has natural stretch in one direction and almost none in the other. When you adjust, always work with the grain, never against it. Fighting the bias is how you end up with a qipao that looks perfect on the hanger and terrible on the body.