
Techniques for Matching the Position and Size of the Decorative Buttons on Cheongsam Jackets
Qipao Pankou Placement and Sizing: A Master Guide to Perfect Positioning
The pankou — that iconic knotted button adorning every qipao — is far more than a functional closure. It is the soul of the garment, a tiny sculpture that bridges structure and artistry. Getting the placement and sizing wrong can ruin even the most exquisite silk. Here is how seasoned makers nail every single detail.
Understanding Standard Pankou Dimensions Before You Place a Single Knot
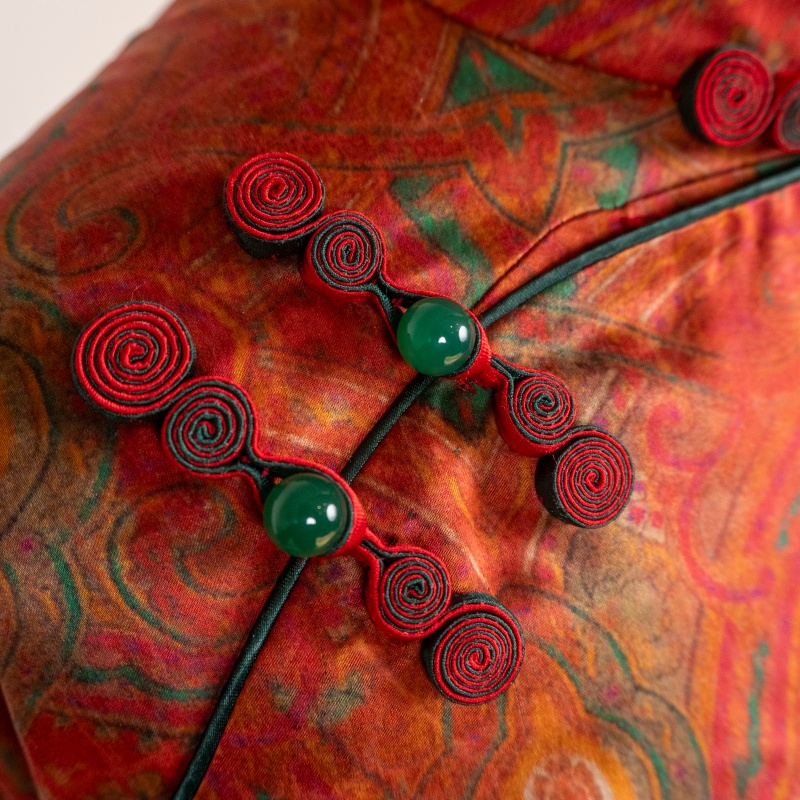
Most people assume pankou sizing is arbitrary. It is not. The diameter of a standard qipao button hovers around 1.2 cm, and this number exists for good reason. At this size, the knot sits flush against the fabric without overpowering the neckline or collar line. Push beyond 1.5 cm, and you enter the territory of “large-grain” pankou — these deliberately bold buttons reinforce the silhouette of the front opening and add a handcrafted warmth that smaller knots simply cannot deliver.
The strip used to form the knot — called the koutiao — should measure 0.25 to 0.3 cm in width. Anything wider tends to flatten out during coiling, losing that satisfying roundness. Anything thinner lacks body. Consistency matters enormously here: use a ruler as your guide when cutting the strip, because uneven thickness will show the moment you start coiling.
For the button loop (the koudang), the standard length is 1.5 cm, with the button stem (koushen) measuring 1 cm. When sewing the button onto the placket, start your needle 0.5 cm from the tail end on the reverse side, bring it through to the front, and work at a stitch spacing of 0.1 cm. Stop 0.5 cm before the button head mark, backstitch several times for reinforcement, and tie off on the reverse. Critically, leave a small gap — roughly 0.5 cm of unfixed strip near the loop — so the button has room to breathe when fastened. Makers call this the “neck” of the button, and skipping it is the single most common mistake beginners make.
Strategic Placement: Where Every Pankou Belongs on the Qipao
Placement is not decorative whimsy. It follows the geometry of the garment.
The Front Center Anchor Point
The very first pankou always sits at the front center line — this is your anchor. From there, every other button follows a calculated rhythm. On a typical eleven-button qipao, the sixth button lands exactly where the diagonal placket line intersects the side seam. That intersection is your secondary anchor.
Dividing the Side Seam into Equal Sections
Here is where precision becomes art. Take the distance from that side-seam intersection point down to where the side seam meets the hip line. Mark a point 7 cm below that intersection. Now divide the entire length into five equal segments — one button per segment. The spacing must be identical between each. This creates a visual rhythm that draws the eye downward and elongates the torso.
Matching Pankou Style to Collar and Placket Type
The type of opening dictates the complexity of your knots:
- High stand collars demand three or more pairs of straight one-character buttons or elongated knots. The vertical line of the collar needs vertical emphasis.
- Large round collars pair beautifully with a single large floral pankou at the throat — one dramatic statement, not a row of small ones.
- Single-placket qipaos can carry richer, more elaborate pankou arrangements.
- Double-placket qipaos should stay minimal — small, exquisite knots only, never large floral pieces that clutter the double line.
The Art of Proportional Harmony Between Knot and Fabric
A pankou that clashes with its fabric is like a wrong note in a melody. The rules are straightforward but unforgiving.
Solid Fabric Calls for Contrasting Pankou
When the qipao is cut from a single-color silk — say, deep burgundy or midnight blue — the pankou should be a different color entirely. It becomes the accent, the pop, the reason the eye lingers. A pearl or jade button head on a plain one-character knot elevates the whole look without shouting.
Patterned Fabric Demands Subtle Pankou
Flip the logic for patterned silk. If the fabric already blooms with peonies or dragons, the pankou should be solid-colored and understated — a quiet green leaf, not another flower competing for attention. The knot serves as punctuation, not competition.
Knot Complexity Must Mirror Fabric Detail
A qipao with heavy embroidery, lace trim, or layered borders needs simple, ancient-style one-character buttons. A qipao that is clean and minimal earns the right to wear elaborate floral pankou — plum blossom knots, butterfly knots, even葡萄-shaped clusters. The principle is absolute: never let the pankou outshine the garment, but never let the garment outshine a well-placed pankou either.
Practical Tips From the Worktable
When coiling floral pankou, the strip must be cut slightly longer than you think you need — you always lose length to the coiling process. Use tweezers to curl the strip, never your fingers; fingers crush the grain. Keep the coil loose during shaping, then tighten only when you pin it to the fabric. Use drawing pins to hold the shape on the cloth before stitching, giving the knot room to sit naturally rather than lying dead and flat.
For the thread: use strong, matched-color thread to sew the knot body onto the placket, and switch to lustrous silk thread when attaching the button head. The difference in sheen is subtle but unmistakably professional.
The strip material should match the piping (gunbian) in both color and texture. If the piping runs 0.5 cm wide, the strip width stays consistent. This visual continuity is what separates a qipao that looks handcrafted from one that looks haphazard.